Digital Electronics (USIU)
Digital Electronics
Study of Logic Gates – AND, OR, NOT, NAND, NOR, XOR
LABORATORY 1
EXPLORING RASPBERRY PI
Pre-Lab Exercise 1: Installing OS on Raspberry PI
The RPI will not boot up without an SD Card that is properly formatted to contain a suitable boot loader and operating system.
The distribution we have chosen to run in this lab and subsequent labs is called Raspbian.
We will use NOOBS operating system installer to install Raspbian
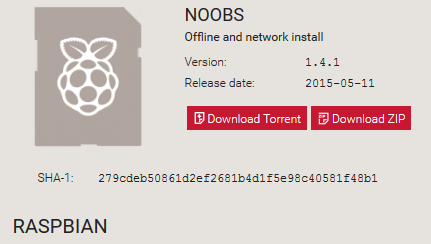
- Using a computer with an SD card reader, visit the raspberry pi official downloads page.
http://raspberry.kenet.or.ke/images/5/59/Noobs1.png
https://www.raspberrypi.org/downloads/
- Click on the
download ZIPbutton under ‘NOOBS (offline and network install)’, and select a folder to save it to. - Extract the files from the zip.
- Click on the
download ZIPbutton under ‘NOOBS (offline and network install)’, and select a folder to save it to. - Extract the files from the zip.
Preparing SD card on Linux/Windows Platforms
- Preparing SD card on Linux/Windows Platforms
On windows format your SD card before copying the NOOBS files onto it.
- You will need a 4GB or larger card. You will need a 4GB or larger card. NOOBS holds the various distros and support files for the “recovery” process. Basically, the installer lives on the card
- Go to the SD Association’s website and download SD Formatter 4.0 for Windows
(https://www.sdcard.org/downloads/formatter_4/) - Follow the instructions to install the software.
- Insert your SD card into the computer or SD card reader and make a note of the drive letter allocated to it.
- In SD Formatter software, select the drive letter for your SD card and format it.
Copy and Paste the NOOBS files
- Once your SD card has been formatted, copy all the files in the extracted NOOBS folder and paste them onto the SD card drive.
- When this process has finished, safely remove the SD card and insert it into your Raspberry Pi.
- Format the SD card on the Linux Platform
On linux the following assumes you have root/administrator privileges
- First we need to download the ISO from the downloads page
(https://www.raspberrypi.org/downloads/)
Select an OS either Raspbian, UBUNTU mate or Snappy UBUNTU core - Find the device, assuming your system is different to mine. The easiest way is to run the following:
#fdisk -l
(This command lists all the mounted and unmounted devices on your computer.)
- Once you have identified your device and the partition enter the following command that will format the SDcard
#dd if=/downloads/raspbian.img of/=sdb bs=512 conv=noerror,sync
- When this process has finished, safely remove the SD card and insert it into your Raspberry Pi and boot it.
Installing OS
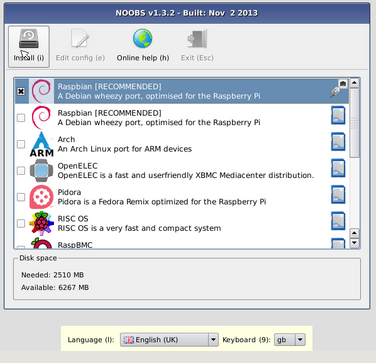
Noobs installer First boot
- Plug in your keyboard, mouse and monitor cables.
- Now plug in the USB power cable to your Pi.
- Your Raspberry Pi will boot, and a window will appear with a list of different operating systems that you can install. We recommend that you use Raspbian – tick the box next to Raspbian and click on
Install.
http://raspberry.kenet.or.ke/images/0/05/Noobsinstall2.png
- Raspbian will then run through its installation process. Note this can take a while.
- When the install process has completed, the Raspberry Pi configuration menu (raspi-config) will load. Here you are able to set the time and date for your region and enable a Raspberry Pi camera board, or even create users. You can exit this menu by using Tab on your keyboard to move to
Finish.
Logging in with Default username and password
The OS will boot to command line where you will need to enter the default username and password
- The default login for Raspbian OS
Username:piwith the
Password:raspberry
Loading the graphical user interface
To load the graphical user interface type
#startx
Pre-Lab Exercise 2:Connecting Pi to the Internet
- WiFi Configuration
- Using the command line
- LAN Configuration
- DHCP Configuration
- Static configuration
- LAN Configuration
Pre-Lab Exercise 3: Installing Applications on PI
- – Updating System
- Installing the Python Package Manager(PIP)
- Installing GPIO Library
- In-Lab Exercises
- In-Lab Exercise 1: Realizing a AND gate
- Wire up the circuit
- Edit the Program
- In-Lab Exercise 2: Realizing a OR gate
- In-Lab Exercise 3: Realizing a NOT gate
- In-Lab Exercise 1: Realizing a AND gate