Difference between revisions of "Instrumentation"
| Line 1: | Line 1: | ||
'''<span style="font-size:large;">Instrumentation</span>''' | '''<span style="font-size:large;">Instrumentation</span>''' | ||
| − | + | <p style="text-align: justify;">This course is taught in the third year of the electrical engineering curriculum. The course mainly deals with transducers for non-electrical quantities and their application to measurement of primary variables. Other areas covered in this course include signal conditioning, remote sensing techniques, microprocessor applications in instrumentation, noise and interference reduction, data storage, recording and display systems. </p><p style="text-align: justify;">We aim to develop a laboratory exercise that will introduce the students to signal conditioning and remote sensing. Remote sensing is important in instrumentation as it enables collection of data from measurement points at inconvenient locations.</p><p style="text-align: justify;">In this lab, the students will use a strain gauge to measure forces and transmit data to a different location via a wireless module. The Raspberry Pi will receive the data, perform signal conditioning and display the measurements.</p> | |
| − | This course is taught in the third year of the electrical engineering curriculum. The course mainly deals with transducers for non-electrical quantities and their application to measurement of primary variables. Other areas covered in this course include signal conditioning, remote sensing techniques, microprocessor applications in instrumentation, noise and interference reduction, data storage, recording and display systems. | ||
| − | |||
| − | We aim to develop a laboratory exercise that will introduce the students to signal conditioning and remote sensing. Remote sensing is important in instrumentation as it enables collection of data from measurement points at inconvenient locations. | ||
| − | |||
| − | In this lab, the students will use a strain gauge to measure forces and transmit data to a different location via a wireless module. The Raspberry Pi will receive the data, perform signal conditioning and display the measurements. | ||
| − | |||
Two labs are under development as follows | Two labs are under development as follows | ||
| − | + | <span style="font-size:larger;">'''Analog to Digital Conversion'''</span> | |
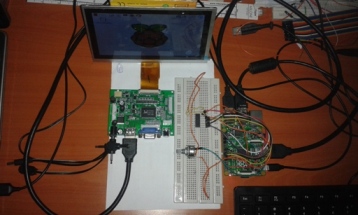
| − | + | <p style="text-align: justify;">Most of signals from sensros are analogue in form. Raspberry Pi being a microprocessor based systems handles only digital signals. It has no inbuild analogue to digital converter. This necessitates for development of an analogue to digital converter in instrumentation.</p><p style="text-align: justify;">MCP3008 analogue to digital converter chip is used in this work. It is a 10 bit, 8 channel IC as shown in the schematic. A variable resistor is used as the source of the analogue signal and is connected to 5 V source. The analogue input (0 to 5 V) is fed to one of the 8 channels of the MCP3008. Other connections to be made are described in the lab manual [[:media:adc.pdf|(see pdf) ]]provided for this lab.</p><p style="text-align: justify;">By adjusting the variable resistor, different values of analog voltages are used for testing the converter. The output (digital equivalent in decimal form) is displayed on the monitor</p> | |
| − | + | The setup and sample results for this lab are shown below | |
| − | |||
| − | |||
| − | |||
| − | |||
| − | |||
| − | |||
| − | |||
| − | |||
| − | + | [[File:ADC setup.jpg|left|ADC setup]] | |
<div><br/></div> | <div><br/></div> | ||
Revision as of 21:32, 13 July 2015
Instrumentation
This course is taught in the third year of the electrical engineering curriculum. The course mainly deals with transducers for non-electrical quantities and their application to measurement of primary variables. Other areas covered in this course include signal conditioning, remote sensing techniques, microprocessor applications in instrumentation, noise and interference reduction, data storage, recording and display systems.
We aim to develop a laboratory exercise that will introduce the students to signal conditioning and remote sensing. Remote sensing is important in instrumentation as it enables collection of data from measurement points at inconvenient locations.
In this lab, the students will use a strain gauge to measure forces and transmit data to a different location via a wireless module. The Raspberry Pi will receive the data, perform signal conditioning and display the measurements.
Two labs are under development as follows
Analog to Digital Conversion
Most of signals from sensros are analogue in form. Raspberry Pi being a microprocessor based systems handles only digital signals. It has no inbuild analogue to digital converter. This necessitates for development of an analogue to digital converter in instrumentation.
MCP3008 analogue to digital converter chip is used in this work. It is a 10 bit, 8 channel IC as shown in the schematic. A variable resistor is used as the source of the analogue signal and is connected to 5 V source. The analogue input (0 to 5 V) is fed to one of the 8 channels of the MCP3008. Other connections to be made are described in the lab manual (see pdf) provided for this lab.
By adjusting the variable resistor, different values of analog voltages are used for testing the converter. The output (digital equivalent in decimal form) is displayed on the monitor
The setup and sample results for this lab are shown below
