Difference between revisions of "Exploring The Raspberry Pi (USIU)"
| (10 intermediate revisions by the same user not shown) | |||
| Line 17: | Line 17: | ||
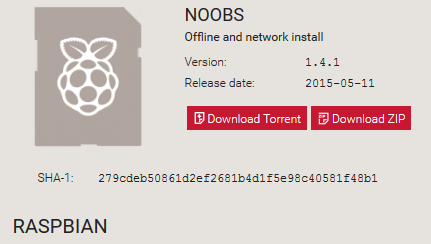
#Click on the <code>download ZIP</code> button under ‘NOOBS (offline and network install)’, and select a folder to save it to. | #Click on the <code>download ZIP</code> button under ‘NOOBS (offline and network install)’, and select a folder to save it to. | ||
#Extract the files from the zip. | #Extract the files from the zip. | ||
| − | + | <div>Preparing SD card on Linux/Windows Platforms<br/></div><ol style="list-style-type:upper-alpha;"> | |
| − | |||
| − | <ol style="list-style-type:upper-alpha;"> | ||
<li>'''Preparing SD card on Linux/Windows Platforms'''</li> | <li>'''Preparing SD card on Linux/Windows Platforms'''</li> | ||
</ol> | </ol> | ||
| Line 55: | Line 53: | ||
#When this process has finished, safely remove the SD card and insert it into your Raspberry Pi and boot it. | #When this process has finished, safely remove the SD card and insert it into your Raspberry Pi and boot it. | ||
| − | + | <div>Installing OS<br/></div> | |
| − | |||
| − | |||
'''Noobs installer First boot''' | '''Noobs installer First boot''' | ||
| Line 77: | Line 73: | ||
'''<u>Loading the graphical user interface</u>''' | '''<u>Loading the graphical user interface</u>''' | ||
| − | To load the graphical user interface type<br/>'''''#'''''<code>'''''startx'''''</code> | + | To load the graphical user interface type<br/><span style="font-family:courier new,courier,monospace">'''''#'''''<code>'''''startx'''''</code></span> |
====== Pre-Lab Exercise 2:Connecting Pi to the Internet ====== | ====== Pre-Lab Exercise 2:Connecting Pi to the Internet ====== | ||
#WiFi Configuration | #WiFi Configuration | ||
| − | |||
| − | |||
| − | |||
| − | |||
| − | ====== Pre-Lab Exercise 3: Setting up SSH (Secure Shell) to remote into the PI ====== | + | *After loading the graphical user interface |
| + | *Select the start menu then select preferences then select WiFi configuration<br/>[[File:WIFI1.png|RTENOTITLE]] | ||
| + | * | ||
| + | |||
| + | '''Step 1. Selecting the WiFi configurator<br/>[[File:WIFI2.png|RTENOTITLE]]''' | ||
| + | |||
| + | '''Step 2.Selecting the network''' | ||
| + | |||
| + | Click on the Scan button and a second window will open. Find your Wireless access point in the list and double click on it. This will open another window. | ||
| + | |||
| + | [[File:WIFI3.png|RTENOTITLE]] | ||
| + | |||
| + | '''Step 3.Joining the network''' | ||
| + | |||
| + | Double-click on the SSID of the access point to connect to, and then type in access password (if required) | ||
| + | |||
| + | [[File:WIFI4.png|RTENOTITLE]] | ||
| + | |||
| + | |||
| + | |||
| + | <span style="font-size:medium">'''Using the command line'''</span> | ||
| + | |||
| + | *'''Step 1 Getting WiFi network details''' | ||
| + | |||
| + | #check the label on your wifi card using the command | ||
| + | |||
| + | <span style="font-family:courier new,courier,monospace">''#iwconfig''</span> | ||
| + | |||
| + | #To scan for WiFi networks, use the command | ||
| + | |||
| + | ''#''<code>''sudo iwlist wlan0 scan''</code> | ||
| + | |||
| + | *This will list all available WiFi networks | ||
| + | |||
| + | | ||
| + | |||
| + | *'''Step 2 Adding the network details to the Raspberry Pi''' | ||
| + | |||
| + | Open the wpa-supplicant configuration file in nano text editor, use the following command | ||
| + | |||
| + | ''#sudo nano /etc/wpa_supplicant/wpa_supplicant.conf'' | ||
| + | |||
| + | #Go to the bottom of the file and add the following: | ||
| + | |||
| + | ''network={'' | ||
| + | |||
| + | '' ssid="The_ESSID "'' | ||
| + | |||
| + | '' psk="Your_wifi_password"'' | ||
| + | |||
| + | ''}'' | ||
| + | |||
| + | In the case of the example network, we would enter: | ||
| + | |||
| + | ''network={'' | ||
| + | |||
| + | '' ssid="CEH"'' | ||
| + | |||
| + | '' psk="testingPassword"'' | ||
| + | |||
| + | ''}'' | ||
| + | |||
| + | Now save the file by pressing '''ctrl+x''' then '''y''', then finally press '''enter'''. | ||
| + | |||
| + | At this point, wpa-supplicant will normally notice a change has occurred within a few seconds, and it will try and connect to the network. If it does not, either manually restart the interface with the commands | ||
| + | |||
| + | ''#sudo ifdown wlan0<br/>#sudo ifup wlan0,'' | ||
| + | |||
| + | or reboot your Raspberry Pi with<br/>''#sudo reboot.'' | ||
| + | |||
| + | #verify if it has successfully connected using the command<br/>''#ifconfig wlan0'' | ||
| + | #(If not, check your password and ESSID are correct. ) | ||
| + | |||
| + | '''<span style="font-size:medium">LAN Configuration</span>''' | ||
| + | |||
| + | *'''DHCP Configuration''' | ||
| + | |||
| + | The Raspbian network configuration file is located at /etc/network/interfaces. | ||
| + | |||
| + | Step 1 Open the network configuration file with the following command<br/>'''''#sudo nano /etc/network/interfaces''''' | ||
| + | |||
| + | A default configuration looks like the following, where DHCP is used for wired Ethernet. | ||
| + | |||
| + | [[File:ETH1.png|RTENOTITLE]] | ||
| + | |||
| + | *<span style="font-size:small">'''Static configuration'''</span><br/>[[File:ETH2.png|RTENOTITLE]] | ||
| + | |||
| + | '''Step 2 '''restart the network services to activate the change without reboot | ||
| + | |||
| + | ''#sudo service networking restart'' | ||
| + | |||
| + | '''Step 3''' check whether an IP address is set or not, type the <tt>ifconfig</tt> command. | ||
| + | |||
| + | ''#ifconfig'' | ||
| + | |||
| + | ====== Pre-Lab Exercise 3: Setting up SSH (Secure Shell) to remote into the PI. ====== | ||
| + | |||
| + | *'''Step 1 Enter the raspberry config by entering the following command''' | ||
| + | |||
| + | ''''' #''''' <code>sudo raspi-config</code> | ||
| + | |||
| + | *'''Step 2 '''then navigate to<span style="font-family:courier new,courier,monospace">advance options</span>, then <code>ssh</code>, hit <code>Enter</code> and select <code>Enable or disable ssh server</code>.<br/>'''check the status of your interface use'''<br/><div>''' ''' <span style="font-family:courier new,courier,monospace">#ifconfig -a</span><br/><br/></div> | ||
| + | *'''Step 3 ssh into pi from another machine using the command'''<br/> #ssh pi@’ip-address’ | ||
====== Pre-Lab Exercise 4: Installing Applications on PI ====== | ====== Pre-Lab Exercise 4: Installing Applications on PI ====== | ||
| − | # | + | # |
| − | ##Installing the Python | + | |
| − | ## | + | '''Now that we are connected to the internet''' |
| − | + | ||
| − | + | #'''Step 1''' To begin installing software first update your system by entering the following command<br/><span style="font-family:courier new,courier,monospace">''#Sudo apt-get update && upgrade''</span> | |
| − | + | #'''Step 2''' Installing python package manager by entering the following command<br/><span style="font-family:courier new,courier,monospace">''#Sudo apt-get install python-pip''</span><br/>(pip is a package management system used to install and manage software packages written in Python) | |
| − | + | #'''Step 3''' Installation RPi.GPIO by entering the following command<br/><span style="font-family:courier new,courier,monospace">''#Sudo pip install rpi.gpio''</span><br/>(this allows you to access the raspberry pi general IO pins using the a numbering system BCM or BOARD) | |
| − | + | ||
| − | + | GPIO layout | |
| + | |||
| + | [[File:GPIO.png]] | ||
| + | |||
| + | Thus at the top of every python script, after importing the RPi.GPIO module, we set our GPIO numbering mode. | ||
| + | |||
| + | As shown in the diagram below | ||
| + | |||
| + | [[File:GPIO1.png]] | ||
Latest revision as of 20:55, 28 July 2015
Contents
Pre-Lab Exercise 1: Installing OS on Raspberry PI
The RPI will not boot up without an SD Card that is properly formatted to contain a suitable boot loader and operating system.
The distribution we have chosen to run in this lab and subsequent labs is called Raspbian.
We will use NOOBS operating system installer to install Raspbian
http://raspberry.kenet.or.ke/images/5/59/Noobs1.png
https://www.raspberrypi.org/downloads/
- Click on the
download ZIPbutton under ‘NOOBS (offline and network install)’, and select a folder to save it to. - Extract the files from the zip.
- Click on the
download ZIPbutton under ‘NOOBS (offline and network install)’, and select a folder to save it to. - Extract the files from the zip.
- Preparing SD card on Linux/Windows Platforms
On windows format your SD card before copying the NOOBS files onto it.
- You will need a 4GB or larger card. You will need a 4GB or larger card. NOOBS holds the various distros and support files for the “recovery” process. Basically, the installer lives on the card
- Go to the SD Association’s website and download SD Formatter 4.0 for Windows
(https://www.sdcard.org/downloads/formatter_4/) - Follow the instructions to install the software.
- Insert your SD card into the computer or SD card reader and make a note of the drive letter allocated to it.
- In SD Formatter software, select the drive letter for your SD card and format it.
Copy and Paste the NOOBS files
- Once your SD card has been formatted, copy all the files in the extracted NOOBS folder and paste them onto the SD card drive.
- When this process has finished, safely remove the SD card and insert it into your Raspberry Pi.
- Format the SD card on the Linux Platform
On linux the following assumes you have root/administrator privileges
- First we need to download the ISO from the downloads page
(https://www.raspberrypi.org/downloads/)
Select an OS either Raspbian, UBUNTU mate or Snappy UBUNTU core - Find the device, assuming your system is different to mine. The easiest way is to run the following:
#fdisk -l
(This command lists all the mounted and unmounted devices on your computer.)
- Once you have identified your device and the partition enter the following command that will format the SDcard
#dd if=/downloads/raspbian.img of/=sdb bs=512 conv=noerror,sync
- When this process has finished, safely remove the SD card and insert it into your Raspberry Pi and boot it.
Noobs installer First boot
- Plug in your keyboard, mouse and monitor cables.
- Now plug in the USB power cable to your Pi.
- Your Raspberry Pi will boot, and a window will appear with a list of different operating systems that you can install. We recommend that you use Raspbian – tick the box next to Raspbian and click on
Install.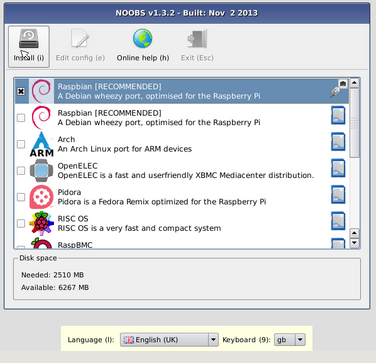
http://raspberry.kenet.or.ke/images/0/05/Noobsinstall2.png
- Raspbian will then run through its installation process. Note this can take a while.
- When the install process has completed, the Raspberry Pi configuration menu (raspi-config) will load. Here you are able to set the time and date for your region and enable a Raspberry Pi camera board, or even create users. You can exit this menu by using Tab on your keyboard to move to
Finish.
Logging in with Default username and password
The OS will boot to command line where you will need to enter the default username and password
- The default login for Raspbian OS
Username:piwith the
Password:raspberry
Loading the graphical user interface
To load the graphical user interface type
#startx
Pre-Lab Exercise 2:Connecting Pi to the Internet
- WiFi Configuration
- After loading the graphical user interface
- Select the start menu then select preferences then select WiFi configuration
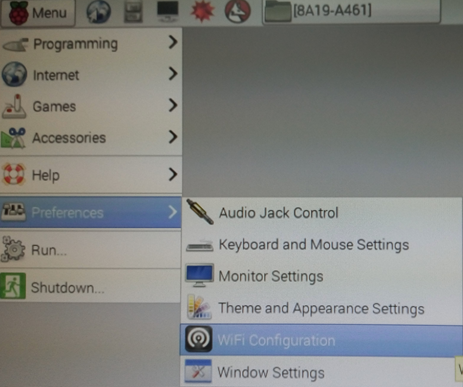
Step 1. Selecting the WiFi configurator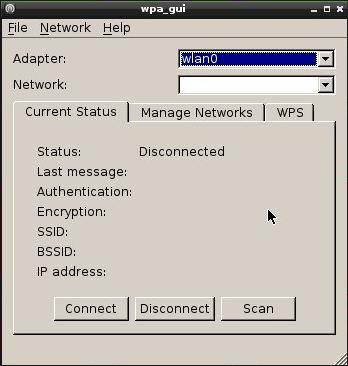
Step 2.Selecting the network
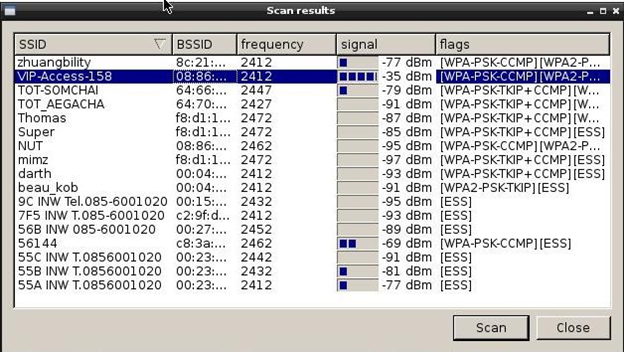
Click on the Scan button and a second window will open. Find your Wireless access point in the list and double click on it. This will open another window.
Step 3.Joining the network
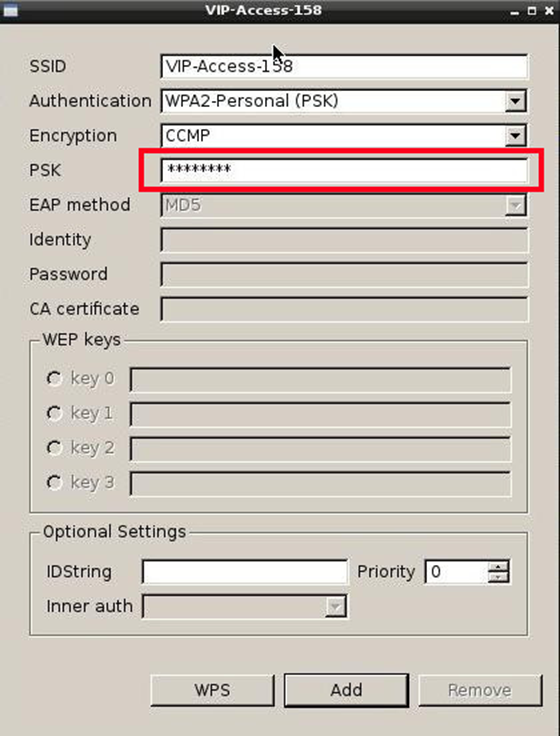
Double-click on the SSID of the access point to connect to, and then type in access password (if required)
Using the command line
- Step 1 Getting WiFi network details
- check the label on your wifi card using the command
#iwconfig
- To scan for WiFi networks, use the command
#sudo iwlist wlan0 scan
- This will list all available WiFi networks
- Step 2 Adding the network details to the Raspberry Pi
Open the wpa-supplicant configuration file in nano text editor, use the following command
#sudo nano /etc/wpa_supplicant/wpa_supplicant.conf
- Go to the bottom of the file and add the following:
network={
ssid="The_ESSID "
psk="Your_wifi_password"
}
In the case of the example network, we would enter:
network={
ssid="CEH"
psk="testingPassword"
}
Now save the file by pressing ctrl+x then y, then finally press enter.
At this point, wpa-supplicant will normally notice a change has occurred within a few seconds, and it will try and connect to the network. If it does not, either manually restart the interface with the commands
#sudo ifdown wlan0
#sudo ifup wlan0,
or reboot your Raspberry Pi with
#sudo reboot.
- verify if it has successfully connected using the command
#ifconfig wlan0 - (If not, check your password and ESSID are correct. )
LAN Configuration
- DHCP Configuration
The Raspbian network configuration file is located at /etc/network/interfaces.
Step 1 Open the network configuration file with the following command
#sudo nano /etc/network/interfaces
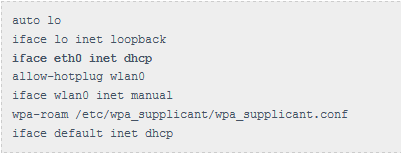
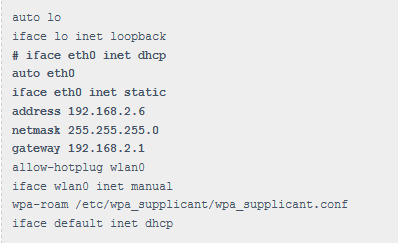
A default configuration looks like the following, where DHCP is used for wired Ethernet.
Step 2 restart the network services to activate the change without reboot
#sudo service networking restart
Step 3 check whether an IP address is set or not, type the ifconfig command.
#ifconfig
Pre-Lab Exercise 3: Setting up SSH (Secure Shell) to remote into the PI.
- Step 1 Enter the raspberry config by entering the following command
# sudo raspi-config
- Step 2 then navigate toadvance options, then
ssh, hitEnterand selectEnable or disable ssh server.
check the status of your interface use#ifconfig -a - Step 3 ssh into pi from another machine using the command
#ssh pi@’ip-address’
Pre-Lab Exercise 4: Installing Applications on PI
Now that we are connected to the internet
- Step 1 To begin installing software first update your system by entering the following command
#Sudo apt-get update && upgrade - Step 2 Installing python package manager by entering the following command
#Sudo apt-get install python-pip
(pip is a package management system used to install and manage software packages written in Python) - Step 3 Installation RPi.GPIO by entering the following command
#Sudo pip install rpi.gpio
(this allows you to access the raspberry pi general IO pins using the a numbering system BCM or BOARD)
GPIO layout
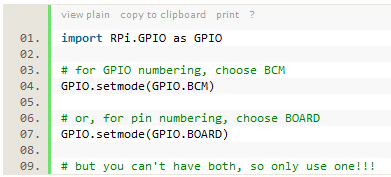
Thus at the top of every python script, after importing the RPi.GPIO module, we set our GPIO numbering mode.
As shown in the diagram below
